Tuesday, May 31, 2011

Recipe of The Month - The BEST & Easiest Bread To Make, Ever!

By Lu

My beautiful delicious breads.....
The reaction I got from people when I showed them this bread was "WOW! You made that?" With pride, I nodded and said.."Uh huh.." When I gave people a chance to try it, they said.."That's some good bread!" In short, this bread is just simply awesome. It is very impressive in looks, and superior in taste. What's more surprising is that it is also so easy to make.

No, I'm not kidding. It is almost a no brainer - especially if you have worked with bread dough before. However, even if you have not, you can still manage rather effortlessly. This is the first time ever I'm having a hard time sharing a recipe. I wanted to keep the bragging rights to myself and not wanting everyone to know the secret. But guess what, if someone didn't share the recipe with me, I wouldn't know how to make it either. So I think I should pay it forward and you all can puff your chest like me when someone gives you a compliment on the bread! It sure is an easy A.

Matt & Kelly
I learned about this bread from a person who can say he is not selfish in anyway - definitely not like me! Well, I was only selfish initially anyway, and I did come around and end up sharing it! He told me I could share it so by all means, I should. Matt and his wife, Kelly, are my foodie friends. We see each other mostly on food occasions whether it is our monthly food club or friends' parties. I know these two lovebirds have fantastic taste in food. Every time they recommended a restaurant, it has always been great! Plus, turned out both Matt and Kelly are pretty great cooks themselves. So, during dinner at last month's food club, Matt was telling me about this bread. He told me how it was so good and I could tell he was really proud of it. He showed me a picture and I was like... "WOW!" Yep, the same reaction I got now from people when I showed them my bread! I didn't even have to force getting the recipe from him as he was generously sharing. That's just it - if you have something so good, you almost can't help but to share it. You want the whole world to know.

I'm not sure how Matt got the recipe; however, on the copy he emailed me it has a name of "Jim Lahey" attached to it. The recipe calls it "Basic No Knead Bread."

Since getting the recipe, I have made 8 loaves. I don't think I will ever buy bread again. You can't get a bread this good at the local grocery store. You may never will either. So, here's the recipe and do try it!

INGREDIENTS

3 cups (400 gr) bread flour (High Gluten/Protein)
1 1/4 teaspoon (8 g) salt
1/4 teaspoon (1 g) active dry yeast (yes, only 1/4 tsp)
1 1/3 cup (300 gr) cool water (put water in refrigerator or if it's room temperature, add a couple ice cubed before using).
Additional corn meal, wheat bran, or just flour for dusting

Mix ingredients in a bowl or container.

Put flour, salt, yeast, and water in the bowl. After making it several times, I found that adding just one cup of water first works better than adding the whole thing of water. So, add a cup, and start mixing it by hand. You can use spatula, but I find hand works best.

Dough should be wet and sticky when you mix it.

The best part of making bread is feeling that dough in your hand, and though the original recipe said "no knead," I knead mine gently while mixing it. Then I will add the last 1/3 cup of water to finish up mixing. You want the dough to be sticky and wet. When I added the whole water right away, I found that the flour just soaked it up and you end up having to add a little more to get the right consistency. So, if you use up your water, and your dough doesn't look like in the picture above it can stand adding a couple tablespoons more of water. Once it is mixed, you can cover the bowl using either a big plate, a plastic wrap, or a clean kitchen towel. Then, leave it to ferment for 12 to 18 hours.

Oh yeah...you need to plan making this bread! My friends laughed at me as there were occasions I had to wake up at 4 am to work with the dough, or that I stayed up  till midnight to mix the dough so that it would be ready to bake by the time I got home from work. It does need some "doughdication!" I always leave mine at 18 hours as I do believe in long fermentation. Plus, it uses such a little amount of yeast so it does take time. You want to leave it in a warm dry place or room temperature at about 72 degree Fahrenheit or 22 degree Celcius. At times, I put it on the couch and covered it up with blanket if the temperature inside was on the lower register. In the summertime, there will be absolutely no problem with fermentation. For winter, it may take up  to 24 hours!

The look of a well fermented dough

After 18 hours (recommended), the dough should have added volume, darker in appearance and bubbly in the surface. Then,  get a clean kitchen towel ready. Lay it on the counter and sprinkle some corn meal/wheat bran, or flour in the middle of it. Using a dough scrapper, get the dough out of the bowl. Make sure you flour your hand thoroughly so that the dough won't stick to your hand. I also sprinkle flour on the dough itself. I don't use counter top to work with the dough, but if you do, make sure anything the dough touches is floured.

A stretched dough should form a smooth surface like so..

Once you get the dough out of the bowl, and then take one edge of dough using one hand (that has been well floured) and take another edge using your other hand, and stretch the dough by pulling both edges downward and make them touched and tucked in below. Do it again from other directions, until you get a nice looking ball with smooth surface. Lay the ball over the sprinkled corn meal on the towel, with the nice smooth surface on top. Cover, and let it proof for 1 to 2 hours more. You guessed right, I always do the 2 hours! A successful proof will yield a dough that will hold the impression of your finger if you poke it.

Carefully invert dough seam side up into the hot pan, don't get burn!

When it gets to about half hour before the 1 or 2 hours expires, heat up oven to 475 degree Fahrenheit or 245 degree Celcius. Also place a 4.5 to 5.5 quarts (25 cm in diameter) heavy pot or dutch oven inside the oven to heat up (with the lid). Once heated (30 minutes), carefully remove the empty pot using oven mittens. Remove the lid carefully. Get the dough, and uncover over a sink and then shake the excess corn meal or wheat bran. Slid the palm on your hand under the dough with the towel in between still, hover over the pan, and invert and plop the dough inside the pan, seam (ugly) side up. Get the mittens back on, place the lid on top of the pan and then put it in the oven.

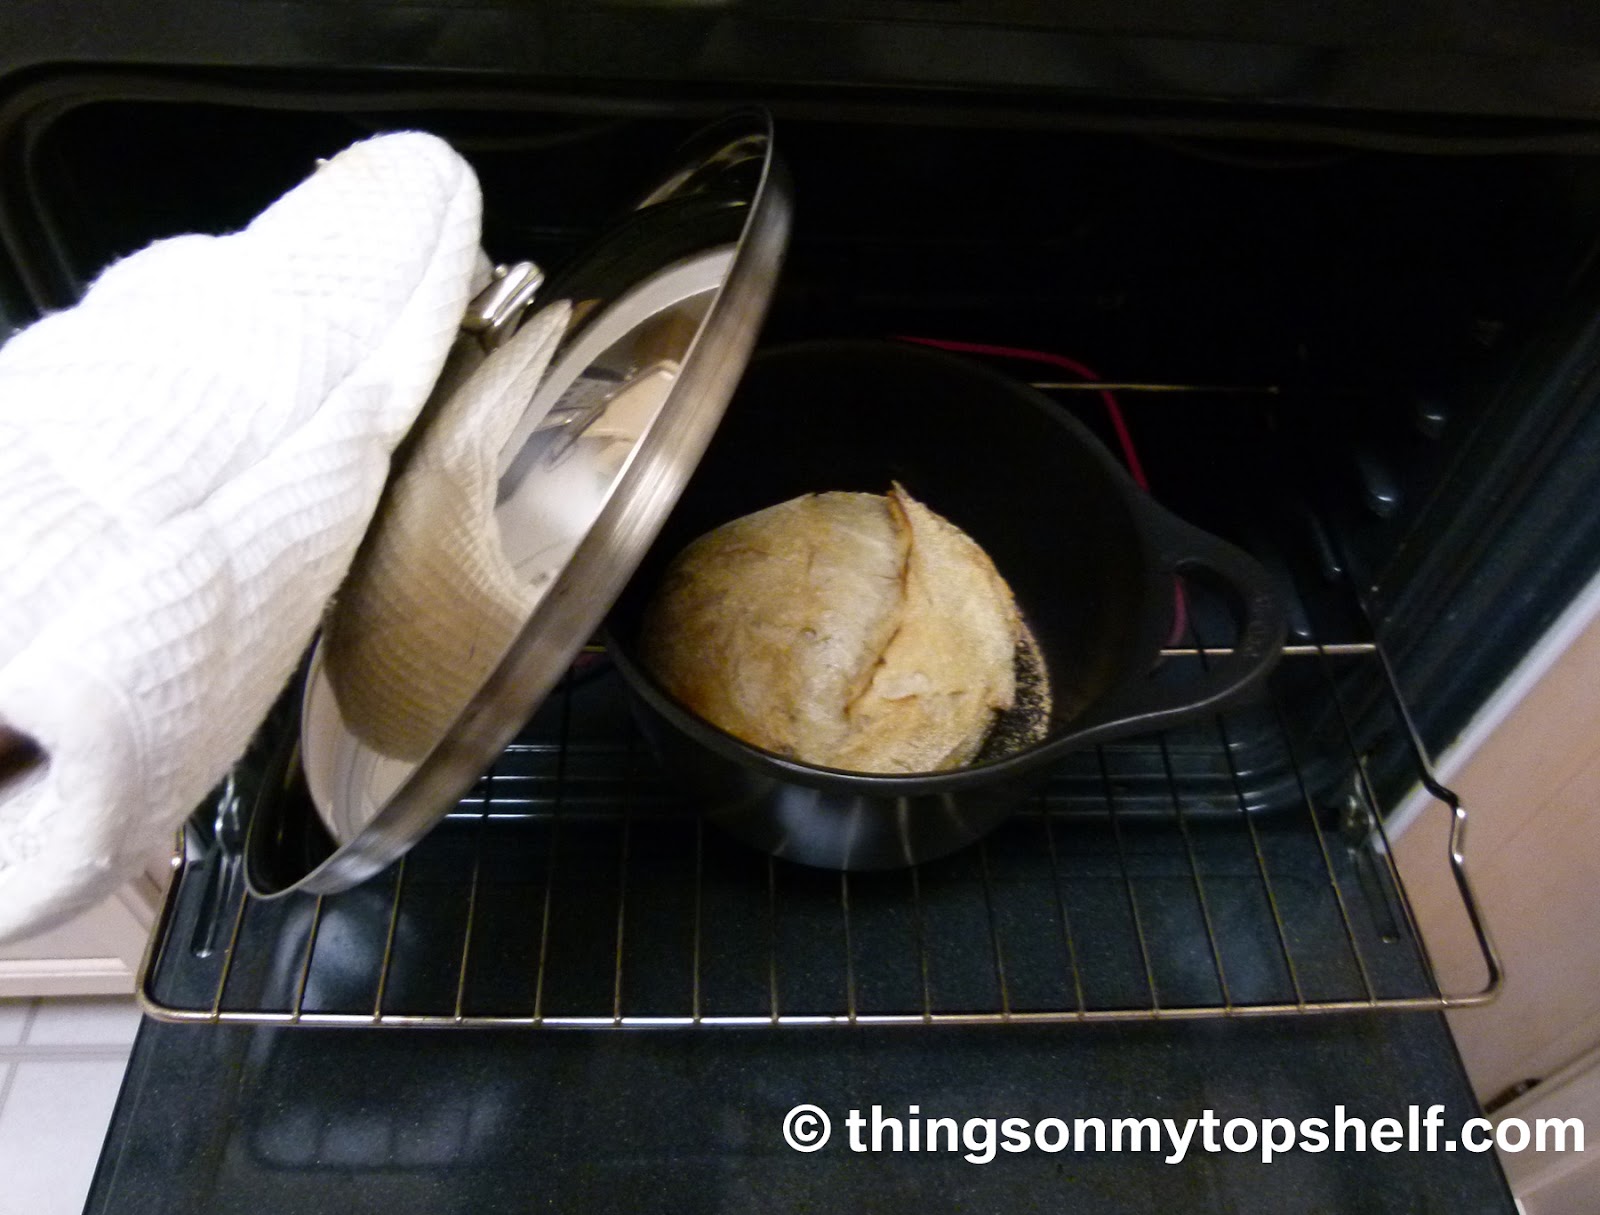
Uncover lid after 30 minutes, continue to bake..

Bake for 30 minutes. After 30 minutes has passed, take the lid off the dutch oven, and continue to bake for about 5  to 15 minutes more depending on the oven. The original recipe says 15 to 30 minutes. I burned the bottom as well as the top of my first bread. The next bread I made, I just baked it for 5 minutes more with the lid off and I got a gorgeous deep chestnut colored bread. Once you get the right coloring on the bread, remove it from oven, take out using a spatula, and let it cool on a rack.

The bread should have this coloring when it is done

Once cooled, you can break the bread open and enjoy it! Oh, it tastes so good when it's warm. I can eat it with just about anything - butter, olive oil and balsamic vinegar, peanut butter..you name it. The bread definitely has that artisan feel to it, with the crusty surface and soft inside. I made a BLAT (Bacon, Lettuce, Avocado, and Tomato) sandwich the other day, and wow... WOW!

There you go. Easy right? Yeah, believe me you will still think I am cool even after you found out how easy it is to make this bread. I am still cool for not only making this bread, but also for sharing the recipe with you. You will be just as cool as I am! However, big thanks to Matt, because if it wasn't for him, none of us would ever be this cool. But he is the coolest of us all. Thank you Matt - I will forever be grateful for this recipe!

Thursday, May 26, 2011

The NRA Show - National Restaurant Association Trade Show

By Lu

NRA Sign at the Show
I always anticipate the coming of the NRA every year. Every one who isn't in the know always says to me.."The National Riffle Association?! You're into guns?!" Hell yeah, I am.

Just kidding! If I have a gun, it has to be a Glock 18 and it has to be pink. So, since I am sure I can't have that, thus, I don't like guns. However, I do like the other NRA, The National Restaurant Association. The NRA holds a trade show each year and it has always been in Chicago's McCormick Place Convention Center (ever since the first time I've attended anyway). If you have been to McCormick Place, you know it is a huge place. Therefore, you're right to guess that this show is also massive.

The NRA show is not open to the public - only to those in the industry and you have to have a company Tax ID number in order to obtain a credential. The show is filled with all kinds of restaurant suppliers from furniture, menu design and technology, plates and kitchen wares, kitchen equipment, and decorations. Also, most major food companies would have a booth. You will find from small suppliers of specialty food products to the giants like Coca Cola. You definitely will see what is trendy right now in the food and restaurant world. I noticed before with Bob Chinn's Restaurant in Wheeling, Illinois - every time after the NRA, there would always be a change to their menu or component of a menu item. I used to see Bob walking the show, and thus why I put two and two together.

McCormick Place, Chicago, Illinois
The first time I came to the NRA, I was an exhibitor with my old company. It was tiring as you had to work the floor, and then you still had to go to business dinners afterward. Now, I just come as a visitor and I'd say it's so much more fun. I can come and see everything, sampling things, and having fun. The bad part is I still get tired.

A snippet of the NRA show floor
The last NRA show was held last weekend and ended this Tuesday (May 21-24, 2011). I went with Helen and Michael on Sunday, May 22 and it was a blast. Helen wanted to come earlier, but we didn't end up leaving until 10 a.m. We thought we had enough time to walk the whole entire floor in 5 hours. We barely did it, but at the end, we were exhausted. Our feet were so sore. We had to get a foot massage afterward. However, I couldn't say it wasn't fun. It was worth the throbbing cramping pain on my calves all night. Nothing that Aleve couldn't help.

The show was fantastic as always. I'd love to share with you some of the highlights for me.

MY FAVORITES
Some of my very favorite food items/brands made appearance on the show! The only two favorites I didn't find this year was Nathan's Hotdog and Phillip's Crab. I remember the delish crab cake samples Phillip's used to always serve. They were there, but I must have missed it. Darn!

Achatz Pie Company
Achatz Pie Company has a booth and their pies are awesome! You can find them at Whole Foods or other specialty stores and through their online store. They are quite pricey however.

People in the US, especially in Chicago, would think that this pie company belongs to the celebrated chef of Alinea's fame, Grant Achatz. Well, not quite. The pie company is run by his cousin and it is located in Shelby Township, Michigan. It does not come from Alinea's kitchen. It is kind of funny because if you are familiar with Alinea's molecular gastronomy style, it is so far removed from old fashion flaky cherry pie. 

But, apparently the apple does not fall far from the tree. Both Achatzes seem to have superior skills in the kitchen. Different styles perhaps - but both have very successful businesses. I'd say it is not shabby at all  to have the name "Achatz" though people don't always know how to pronounce it correctly. It is pronounced as "akets."
Guittard Chocolate
One of my favorite chocolates to bake with, other than Callebaut, Guittard sampled one of the best chocolate cakes ever on the NRA show.

My sample cup
Need I say more? I wish I could go back and forth, getting my free LavAzza Cappuccino. However, I had to save the stomach for more sampling. I really am tempted to open my own LavAzza franchise. I love this coffee so much!

Nueske's Bacon
My old co-workers, Chef Jim Reynolds and Chef Kerri Fisher introduced me to Nueske's Bacon at the NRA some years back. They told me this would be the best applewood smoked bacon ever in existence.

They were right. This Bacon is out of this world good. Back  then, we would go back and forth to the Nueske's booth for bacon samples. We could eat it all day.

Nueske's is a company based in Milwaukee, Wisconsin and they know how to cure pork. This bacon is not cheap, but worth every penny.

If you're ever in Wisconsin, try to stop at Nueske's or you can get it by the pound at Sendik's grocery stores. There are some national chains that may sell it. I am not sure which one however. But google it or something. This is not a pedestrian bacon by any means!


THE VARIOUS DISPLAYS

Mouth Watering Dessert Case

Abundance of Breads

Cheese and more Cheese

Deli Case by Dietz & Watson

Ludo Truck, by Ludo LeFebvre, Food Trucks are definitely trending on this year NRA.

SAMPLES

Fruit Bobba
I think the fruit bobba is my best find this year. I went back several times for more. They're pretty much bubbles and when you bite into it, fruit juice bursted into your mouth. Helen said Red Mango has started using this as one of their toppings. Yum! I can't wait to go to Red Mango for some fruit bobbas!

Beer anyone?

Frozen Yogurts dominated the show. So many of them!

Fried Shrimp and Stuffed Sole from Trident Seafood.

Super tender prime rib!

FOOD PEOPLE AND FUNNIES

Not in Hoboken, not in NRA, Cake Boss is popular

Chefs at Rational Oven were giving demonstration

Michael, picking a fight with Heinz Ketchup Bottle. Shout out to Kerri!

Chef Paul Prudhomme is skinny now!

Had to take picture of this decadent looking chocolate caramel cake. OMG!

Keegan Gerhard from Food Network, doing demo
All the freebies I bagged. I didn't do that good in snagging things this year.

Me and Top Chef Season 7, Kevin Sbraga

All in all, I was satisfied with this year's show. The best for me again was the Fruit Bobba. Silly I  know, but that was what I like. I also had samples of tons of cookies, soups, various hotdogs and sausages from Vienna Beef, Dietz and Watson. I was missing Nathan's and Hebrew National this year. I had a taste of super yummy cheese that I will track down and find and it's called "Crema Kasa". That cheese was so smooth, buttery and had so much flavor. It reminded me of a Dutch cheese I used to have back home. The endless food trucks were also showing me that it is getting even more popular now. Other than the popular people I took picture of, I was sad to miss David Burke and Mario Rizzotti from Barilla Pasta and Iron Chef America's Judge. It was cool to meet and talk to Top Chef Kevin Sbraga as well. Last year, I saw Blais and Spike Mandelsohn. I so wished I could have met Michael and Brian Voltaggio as well. But, oh well...maybe next year. I talked to Kevin about our blog and gave him our business card. He said he'd check it out. Sure...  but I do hope he would!

Till next year, NRA!

Saturday, May 21, 2011

Mapo Restaurant - Naperville, IL

By Lu

Chili Rubbed Chicken
I try not to write something very local to my vicinity (all the time) as I know our audience is spread all around the world; yet, I have to make an exception once in awhile. After all, things around me are the things I get to experience and report on. Especially now that my sister is taking her time trotting all over the US, you are sort of stuck with me and my materials. Hey, it's not that bad, right?

No doubt that there are hundreds, even thousands of restaurants in Chicagoland area. Some are renowned and famous all over the country, if not the world. Why did I choose to write about this small restaurant in a corner strip mall in Naperville, Illinois? Well, because I had some of the most unique and spiciest foods I've ever tasted there. This restaurant definitely deserves a spot on my top shelf.

TV shows like "Bizarre Foods with Andrew Zimmern," or "Man vs. Food." portray the new breeds of eaters: the adventurous kind, the competitive kind, and the gorging kind. Well, you can do all those kinds of eating at Mapo. Their foods are definitely adventurous and they don't really serve just the mainstream American Chinese menu. You need to ask the server for their special menu or specialties. If not, you will miss out. If you ever see a TV show when they try to compete eating wings with the hottest sauce possible - well, you will discover a new kind of spicy at Mapo. Lastly, when you eat there, it is almost guaranteed that you will gorge yourself!

The first time I went to Mapo was with my friend, Helen. Helen and Michael (her husband) introduced me to the "Chili Rubbed Chicken," there. This dish is small nuggets of chicken that have been deep fried so crispy and rubbed with dried red peppers, and then pan fried again with more dried chilies. If you ever tried those dried red chili peppers from Szechuan, you know they're HOT HOT HOT!

I fell in love with that dish almost immediately. Some of my friends thought I don't like spicy food. That is not true. I don't like adding hot sauce to my food to spice it up. But, if the dish is already spicy, I love it! I'm definitely not the competitive kind of eater; however, I did try to see how far I could go there at Mapo.

This restaurant definitely serves the spiciest yummiest Chinese food in Chicagoland. There's another place that is known for serving spicy food in Chicago, Lao Sze Chuan. However, I must say I do like Mapo better. That "Chili Rubbed Chicken" always invites me back there each time! They're so succulent, so crispy, so spicy, and you can't have enough of it! If you close your eyes and chew on a piece of crispy chicken, it actually tastes like a crispy spicy bacon! What's not to like?!

Last night, I dined there with my friends C.K, Sabrina, and Kinzie. C.K and his wife, Sabrina go there all the time and know the owner quite well. We got the royal treatment almost immediately. Hey, I could get used to this! They talked in Chinese and though I couldn't understand what was said, I knew it would yield something delicious on the table. I wasn't too far off from that estimation.

We relaxed and drank some tea while we were waiting for the food to come. The ambiance was nice, and the table was covered with white paper. I didn't miss the sticky tables at most Chinese restaurants I must say. Plus, the companies I had were fabulous. I knew I was off to a great Friday night.

Mouth Watering Chicken
The first dish came, and it was a cold appetizer called "Mouth Watering Chicken." Damn straight it was mouth watering! You could smell the spices and the spicy oil almost immediately. I could also called this dish "Mouth Numbing Chicken," as it was so hot! Szechuan peppers have that unique sensation of numbing your mouth instead of lighting it on fire like a Habanero would. Yep, I was off to a good start in the pepper lane.

Then, the array of dishes hit the table one by one: My pick was of course "Chili Rubbed Chicken." It's a must-have for me. C.K, Sab, and Kinz were probably laughing at me for being so amateur about Mapo. It was okay though! I had a hunch that I was about to get schooled and I was happy about it. Next came C.K's favorite: "Sampan Pork." This dish consisted of deep fried short ribs of pork, spiced up with some melange of ground-up spices that were deep fried to create crunchy and crispy crumbs of tasty goodness. Imagine those crispy batter pieces that you can get from KFC? Imagine it ten times better! Sampan in Malay means a small boat. I still didn't get the correlation to why the pork was called small boat pork. C.K also told me that one of their cooks is Indonesian and thus why some of the names are in Malay or Bahasa Indonesia. But, I was too busy eating and gnawing on those ribs to worry about the name!

Sampan Pork
I thought we had all of our dishes. Nope. Next - Sabrina's favorite, broiled white fish, but it almost looked like the fish was poached in the spicy red colored oil. When you looked at the dish and the oil, it just looked like it was going to nuke your mouth on fire. Then, you would imagine the pain later on. I was a little afraid in the beginning. I took the fish and strain the oil as much as possible. C.K then spooned the oil and put in my plate.."You have to eat it with the oil, lah! Try a little." he said in not so many words. He was kind and put some oil on the side of my plate. Sab told me that the oil has a medicinal quality of some sort. She is about 7 months pregnant and since she got pregnant the only Chinese food she likes are the spicy kinds. She loved the fish, and I agreed with her. The fish was so sweet, tender, juicy, and spicy. It was damn good.

Broiled White Fish in Spicy Oil
Kang Kung sauteed with Garlic
Thank goodness C.K also ordered a veggie dish. This one wasn't spicy but it complemented the other dishes very well and helped cool your palette. C.K ordered the "Kang Kung" or water spinach sauteed with garlic. Water spinach is a well known green legume in South East Asia. They look  like spinach, but their leaves are triangular and longer than spinach. Their stems are hollow and crunchy and they are usually grown in the swamp - thus the name, water spinach. Kang Kung can also make you really drowsy if you eat a lot of it. It is a yummy vegetable for sure.

The only bad thing for me eating super spicy food was that I had to eat it with rice to cut some of the heat. However, you then kept on adding rice and you ended up overeating. I was gorging last night because that heat made you wanting more, and then you kept on adding rice. Before you knew it, your pants were about to bust open. Yikes.

Even though I was too busy gorging myself and I forgot to take pictures of my friends; I had a chance to be nosy and looked at what other people were eating. This couple on the next table was eating a noodle soup that looked so good. C.K told me it was the "Spicy Taiwanese Beef Noodle Soup." The beef cubes were slow cooked in a broth spiced with dried red peppers, star anise, and other Chinese herbs, served with homemade white noodle, and garnished with cilantro. My mom used to make this when I was young and I really love that soup. I definitely have to come back and try Mapo's version of this soup. C.K said it was one of their most famous dishes in the menu.

Kinz is a great professional photographer and too bad he didn't bring his camera. I made him take some pictures for me using my humble camera. So, if you think the picture is nice - it is probably his doing. If it is bad, it's definitely mine!

I had such a great time there. Not only the dishes were delicious, the friends and conversation were top shelf!

If you like spicy food and not afraid to try something that will get your temperature to rise, try Mapo! Bring friends so you can order several different dishes to get the best experience. Spice things up a little - pun definitely intended!


MAPO 
1563 Naperville Wheaton Rd
Naperville, IL 60563
(630) 420-1388 

Sunday, May 15, 2011

Not Your Everyday Pineapple Upside Down Cake

By Lu

A slice of Pineapple Upside Down Cake, piping hot from the oven!

I've been making this cake for as long as I could remember. I didn't really remember where I got the recipe at first. I believe it was from this make-shift recipe compilation "cookbook" bound by a twine that was given to me by my high school/early college boyfriend's grandmother. I think she gave it to me when we helped her move residence one year when I was a freshman in college. She had some stuff to throw away but I took that book. It has some very good recipes.
Later on, I also found a similar recipe in a book called "365 Great Cakes and Pies." It is slightly different but it is quite the same in taste. This is not the typical yellow cake Pineapple Upside Down Cake. This version has a unique almost corn bread taste and texture to it. I love it! Plus, many of my friends actually like it too.

I was remembered (at one point) at the company I used to work for first thing out of college as the girl who baked this very cake. I made several friends for life from having worked for this company. Tricia and Tina are two of the great friends I made there. Tricia,  to this day, still asks me for this cake - among other things :D (the others being egg rolls and kim chi poo. Sorry, inside joke).

We have planned to get together today, and I happened to have leftover buttermilk from making Red Velvet Cake last week. It was totally perfect to use it up for this cake. So, I came ready with cake at hand!

Further, I happened to post the picture of the cake on Facebook to entice some of my friends I am playing "Food War" game with. Food War is a fun thing I do with my childhood friends, Chika, Peggy, Audrey, and Liza. We post pictures of food that are mouth-watering trying to get the other to break down and cry from wanting it so bad! It is a little sadistic especially for people like me, who constantly craving food from my native country and can't get them where I live. Audrey, who happens to live in Jakarta, is happily posting pictures of Indonesian delicacies that literally make me drool and keep on drooling! Man, I need to start wearing a bib!

I didn't plan for my next post to be another recipe; however, from posting the picture, I received several requests for recipe of this cake. I aim to please; so, here it is!

INGREDIENTS:

1 can of sliced pineapple
Maraschino cherries
1 cup granulated sugar
1 stick (1/2 cup) butter
2 large eggs (separated yolks and white)
1 1/2 teaspoon pure vanilla extract
1 1/2 baking powder
1/2 teaspoon baking soda
1/2 teaspoon salt
1/2 cup yellow corn meal (not corn-starch/Maizena! This is more like polenta)
1/2 cup buttermilk
1 1/2 cup brown sugar
1/2 cup chopped pecans (optional)


Preheat oven to 350 degree Fahrenheit/ 175 degree Celcius. Next, start preparing the ingredients and measure them accordingly. In one bowl, put all the dry ingredients - flour, baking powder, baking soda, salt,  and corn meal. Put it aside. Also measure your buttermilk and get it ready to go. Separate the yolks from the white of the eggs. Put the whites in a bowl where you can whisk or mix later on. The easiest way to separate an egg is to crack it open on the palm of your hand, and let the egg white falls through your finger and onto a bowl, leaving the yolk intact on your hand. If you don't want to get your hands dirty, my mom always crack the shell in two in the middle, and then transferring the yolk back and forth from one shell to another until all the egg white safely falls onto a bowl underneath. Your choice.


Prepare a 10 inch (+/- 25 cm) round pan for baking. Spray the side with non-stick cooking spray or grease it with melted butter. Sprinkle an even layer of brown sugar on the bottom of the pan. If you don't want it to be so sweet, you can lessen the brown sugar and don't use the whole cup and a half. If you prefer it with a thick layer of caramelized granules of brown sugar, then go nuts! Next, arrange the slices of pineapple on top of the brown sugar. Add Maraschino cherries to decorate the hole of what used to be the core of pineapple. You can also use fresh pineapple if you choose. You have to cook the fresh slices first however in a Microwave or stove top with about 1/4 cup of sugar. I think it is too much extra work, but I didn't say it can't be done. Opening up a can seems much easier, especially since we are going to bake the pineapple anyway. You can also add chopped pecans on the area where the brown sugar is not covered by the pineapple slices. However, this is totally optional. Once the pan is prepared, set it aside.


In the mixer bowl, add sugar and butter. Cream well using a medium to high speed on your electric mixer. Then add the egg yolk one by one. Mix well, and stop mixer occasionally to scrape the side of the bowl so everything will be evenly mixed. Add vanilla. Then lower the mixer speed and add flour mixture little by little alternating with the buttermilk, starting and ending with flour mixture. Beat well.


You have to do a fancy maneuvering with your mixer as you will need to beat the egg white in a separate clean bowl and using clean beaters. This can get cumbersome especially if you only have one of each. But it can be done! Think ahead. Don't tell me I didn't warn you. Worse come to worst, you can always use a whisk. Beat the egg white until it is stiff but not dry. Then, fold the egg white in the cake batter with a spatula. Do not stir it, fold it - scrape from the side of bowl and sweep it to the top, and repeat until it is mixed well.


Add the batter on top of the arranged pineapple slices in the pan. Bake it for 40 to 45 minutes or until cake tester (using tooth pick or skewer) inserted to the center of the cake comes out clean, and not wet anymore. With a knife, loosen cake from the edge of pan. Put a serving plate on top of pan, and immediately invert onto it. Thus, the name "Upside Down" cake came from! Oh, do not forget to use oven mitten as it will be hot! Once the cake is safely inverted, lift pan and voila! Let it cool, and then serve with a generous dollop of whipped cream!

Tina and Tricia - let them eat cake!
I think this cake is so easy to make and it tastes super scrumptious. Some people don't like corn meal texture or taste, but I think it makes this cake so unique, and not your every day Pineapple Upside Down Cake.

Tina and I went to visit Tricia today at her house and she got her wish to again taste my Pineapple Upside Down Cake. Believe me, it has been years since she last had it. Though her two year old son, Brennan, was too "distracted" to eat the cake, her husband and daughter didn't! Her little angel, Ava, at first was skeptical about trying something new, but she decided to give it a go. Then, she asked for a second slice! Oh, that made my day! Brian, her husband, also had a second helping! The only thing missing is our other friend, Corinna, who lives in Tennessee. I wish she could have joined us. It is not the same without her and I think she would have enjoyed this blast from the past afternoon treat!

Cute little Ava taking a bite of the cake!
Tricia just left me a comment on Facebook: "This is my fave cake ever. Been years since I had it, but it did not let me down today. Delish! Thank you Lulu. You are so sweet to bake and bring it over."

That is one of the reasons I love to bake for my friends! It makes everything worth it. Now, go make it and enjoy!

Monday, May 9, 2011

Red Velvet Cupcake

By Lu

Red Velvet Cupcake, cut in halves
If you are one of our regular readers, you may notice that I have been doing all the writing lately. I am sure some of you miss Ri and are wondering where the hell is she. Well, she's been taking time off to do some traveling with her husband. She's doing something fun and I have no doubt when she comes back, she will have tons to write about. So, bear with me! I hope I don't bore you too much!

Talking about Ri, she bought me a Red Velvet Cake for my birthday. The cake was so yummy that for awhile I was craving it every day. It was hard to find a bakery nearby to where I live that sells the cake. Turned out, Labriola Bakery by me in Lombard does sell the cake and cupcake. I bought the cupcake several days in a row. I could have bought three or four all at once to eat; but, I didn't think I would want it again the next day! But, I did!

I also have been watching "Cupcake Wars" on the Food Network and I have to admit I am a little fascinated with cupcakes lately. I am usually not a cupcake fan. I didn't get why now it is so popular. But watching the show, I got fascinated on how these competitors came up with various different flavor profiles and how creative they are in creating a winning cupcake. One cupcake maker did a tuna and wasabi cup cake. That is just nuts. Not only they have to worry about the taste, but they also have to think of decorations and the display. Also, one of the carpenters on the show (they're brothers by the way - they build the displays for the competitors) is totally cute. I think his name is Justin. He's really easy on the eyes and his displays always win. I want to be on team Justin!

On the "Cupcake Wars" episodes I watched, almost every one did a rendition of Red Velvet Cupcake - thus, my further fascination with it. So I had to try and make it home myself.  Because of "Cupcake Wars" also I chose to make the cupcake version instead of the layered cake version. My first try wasn't bad, but not as good as I wanted it to be. I followed a recipe online but the bake time was too much as my cake was totally dry. However, my second try was quite good and tasted like store bought!

I ended up combining the recipes I found online - between Paula Deen's recipe and The Joy of Baking's recipe. I compared the two and I made my cake how I usually bake a cake and it turned out pretty darn good. Most of the recipes I found online are pretty comparable; so, there isn't big changes here. A couple points to mention: I prefer to bake cake with oil rather than butter. I found oil makes the cake much moister than butter. Next, we always have to use food coloring to get the red color for Red Velvet. Some people said the red coloring comes from a chemical reaction of vinegar and buttermilk. It has some truth that the reaction brought out the red in the cocoa powder. However, it only works with unprocessed cocoa, and it won't get as red as the Red Velvet we know nowadays. So, yes - red food coloring is needed. Lastly, I found out that real Red Velvet must have pecans. So, instead of decorating it with the cake crumbs, I decorate mine with chopped pecans. Here's the recipe:

INGREDIENTS:

2.5 cup sifted cake flour
1/2 teaspoon salt
2 tablespoon regular or Dutch-processed cocoa powder
1 1/2 cup vegetable oil
1 1/2 cup granulated sugar
2 large eggs
1 teaspoon pure vanilla extract
1 cup buttermilk
2 tablespoon red food coloring
1 teaspoon distilled white vinegar
1 teaspoon baking soda


Heat oven to 350 degree Fahrenheit/ 175 degree Celcius. Prepare one or two muffin tins. This recipe yields between 18 to 20 cupcakes. Line each muffin hole with paper cups. Start measuring your ingredients. Put dry ingredients (flour, cocoa powder, and salt in a bowl).


Next, measure the buttermilk, pour it into a bowl and mix it with the red food coloring. Mix it well. In another bowl, mix baking soda and vinegar and let it fizzed (wait to mix it until it is about time to add it to the batter).


In the mixer bowl, add sugar and oil. Mix well using medium speed electric mixer until it turned light and fluffy. Add egg one at a time, beating well after each addition. Then, add flour mixture and alternating it with the buttermilk and coloring mixture. Add it in three parts, starting and ending with the flour. Mix the baking soda and vinegar. Let it fizzed and add to the batter. Once it is mixed well, stop the mixer.


Spoon the batter into the the muffin cup. I found ice cream scooper works the best and the least messy. You can also try using pastry bag. However, just spooning it with regular spoon is guaranteed messy. I wouldn't recommend it. Fill it about 3/4 full.


Bake the cup cakes about 15 to 25 minutes. Yes, there's a big gap here. It is really depending on how your oven is calibrated. I would totally watch the cake especially for the first time. The recipe I saw told me to bake it between 25 to 30 minutes. My cup cakes were dry and too brown in the bottom. The next time, I only baked it between 12 to 15 minutes. I tested using a tooth pick. If the tooth pick comes out clean, not wet with batter, I'd say yank it! So, watch it and test it for the first batch.


Let it cool. Then decorate with cream cheese frosting, and sprinkle chopped pecans for decoration.

I saw some very elaborate cream cheese frosting recipes as well. However, I stuck with my super simple yet proven tasty cream cheese frosting:

2 packages of 8 oz Philadelphia cream cheese
1 1/2 cup powdered sugar (adjust to taste if you would like it sweeter - add a little more)
2 teaspoon of pure vanilla extract.

Whipped them good until creamy. Taste it for sweetness and then it is ready to use. Put frosting in a piping bag and and then pipe the the frosting on top of cooled cup cakes. No piping bag? No worries, just slather it! It is still guaranteed good.

Some people at work thought these cupcakes were store bought. I still haven't made it enough time to want to brag about it. Some said my cake wasn't sweet enough. However, with the frosting being sweet, I thought the cake was perfect in sweetness. You'll be the judge! Go ahead and try it! It is definitely cheaper than shelling out $5 a pop for a bakery cup cake.

When I brought these cupcakes to work, two of my co-workers made a diet resolution and would have started that day on that fine Monday morning. When they saw the cupcakes, they changed their mind! Whoops! However, they told me it was worth the calories! Whew - I didn't feel so bad then.

Hope you will try it too and make sure you set your diet resolution the next Monday, mkay?!